Hardie Board Replacement A Comprehensive Guide
Hardie board replacement is a common home improvement task, often necessary due to damage, deterioration, or aging. This guide provides a detailed overview, covering everything from initial assessment to final installation, ensuring a smooth and successful project. We’ll explore various replacement methods, considerations for different scenarios, and essential safety precautions.
Understanding the lifespan of Hardie board and the common causes for replacement is crucial. From water damage to structural issues, this guide will cover why your Hardie board might need replacing. We’ll also discuss different types of Hardie board, offering a comparative analysis to aid in your decision-making process.
Introduction to Hardie Board Replacement
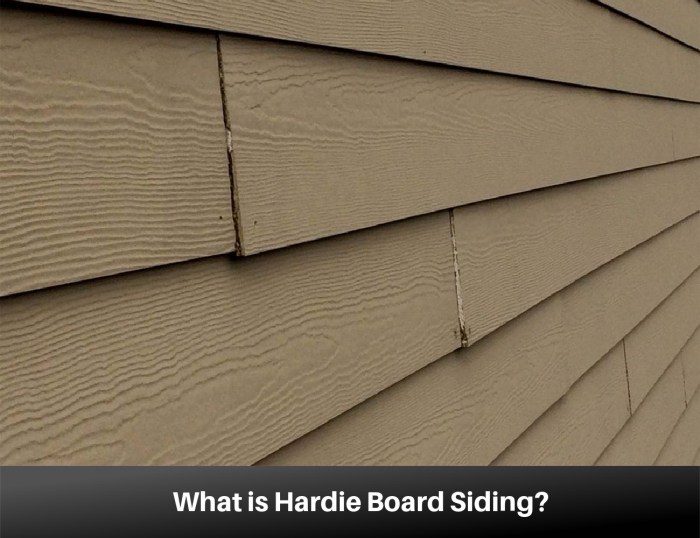
Source: mmbuilds.com
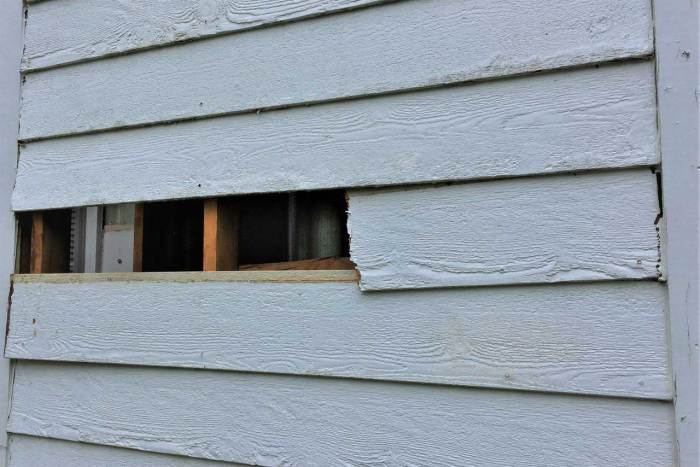
Hardie board, a popular siding material, is known for its durability and fire resistance. However, like any building material, it has a lifespan. Proper maintenance and regular inspections are crucial to prolonging its effectiveness. Over time, damage or deterioration can occur, necessitating replacement.
Common causes for needing Hardie board replacement include damage from impact, deterioration due to weather exposure, and aging. Extensive water damage can severely compromise the integrity of the board, while structural issues may necessitate its complete removal and replacement. The lifespan of Hardie board, in the absence of significant damage, is typically estimated at 20-50 years. This depends significantly on the environment, quality of installation, and maintenance performed.
Common Reasons for Replacement
Several factors contribute to the need for replacing Hardie board siding. Damage from hailstorms, strong winds, or other impact events can necessitate replacement. Over time, exposure to extreme weather conditions, including prolonged periods of sun, rain, and frost, can lead to deterioration of the material’s structural integrity. Age-related degradation is another contributing factor, as the board loses its initial strength and resilience.
Examples of Replacement Situations
Water damage, a common culprit in structural failures, often necessitates Hardie board replacement. Leaks, prolonged moisture exposure, or flooding can lead to significant weakening and cracking, requiring the affected areas to be replaced. Structural issues, such as settling or foundation problems, can also impact the integrity of Hardie board, leading to cracking, warping, and overall instability. In such cases, replacement is crucial for the building’s structural soundness and aesthetic appeal. For example, a homeowner whose house experienced a major leak in the roof may have to replace significant portions of the Hardie board siding to avoid further damage and maintain the structural integrity of their home. Another example is a property experiencing significant foundation settling, where the Hardie board may be visibly affected and requires replacement to maintain the building’s structural integrity.
Hardie Board Types Comparison
Different types of Hardie board offer varying characteristics, making it essential to understand the options available. This table summarizes some key distinctions between popular Hardie board types.
| Type | Color Options | Texture | Thickness (in.) |
|---|---|---|---|
| HardiePlank | Extensive color palette | Smooth, Plank | 5/16, 3/8 |
| HardiePanel | Extensive color palette | Smooth, Panel | 5/16, 3/8 |
| HardieSiding | Extensive color palette | Smooth, Textured | 5/16, 3/8 |
Assessing the Need for Replacement
Proper assessment of the existing Hardie board is crucial for determining the extent of necessary work. Ignoring potential issues can lead to costly repairs or replacements down the line. A thorough inspection helps pinpoint areas needing attention and ensures that the chosen course of action—repair or replacement—is the most effective and economical solution.
Visual Inspection Procedures
Thorough visual inspection is the initial step in assessing Hardie board. Look for visible signs of damage, such as cracks, holes, or significant discoloration. Pay close attention to areas with potential water exposure, like around windows, doors, and roofline intersections. This initial inspection helps identify potential problem areas that may require further investigation.
Identifying Areas Requiring Replacement
Detailed examination of identified areas is necessary to pinpoint the exact extent of the damage. Assess the depth and width of cracks, the size of holes, and the degree of discoloration. Note any areas showing signs of moisture penetration, as this can accelerate deterioration. This methodical approach helps in determining the exact scope of the repair or replacement.
Importance of Professional Assessment
For complex or extensive damage, consulting a professional is highly recommended. Professionals have the expertise to evaluate the structural integrity of the Hardie board, considering factors like the underlying substrate and the overall condition of the affected area. They can accurately assess the level of damage and advise on the best course of action. For example, a professional can determine if the damage is isolated to a small area, or if it extends deeper than the visible surface.
Criteria for Repair vs. Replacement
Determining whether repair or replacement is the best approach depends on several factors. Minor cracks or surface damage can often be repaired, extending the life of the Hardie board. However, extensive damage, such as significant structural cracks, significant moisture penetration, or significant detachment from the substrate, may necessitate complete replacement. A professional assessment can help determine the most suitable option based on the specific damage characteristics. For instance, a small crack in a corner may be repairable, while a large crack spanning several panels likely requires replacement. Consider the cost and time investment of each option before making a decision.
Planning the Replacement Project
Planning a Hardie board replacement project effectively ensures a smooth execution and a successful outcome. Careful planning minimizes potential issues, saves time and resources, and leads to a more satisfying final product. This involves a detailed assessment of the project scope, material needs, and potential costs.
Thorough planning is crucial for a successful Hardie board replacement project. A well-defined plan Artikels the steps involved, identifies potential challenges, and sets a realistic timeline, enabling efficient resource allocation and cost management.
Essential Steps in Planning
A comprehensive plan Artikels the project’s scope, identifying specific areas needing replacement. This includes accurately measuring the affected surfaces and determining the required quantity of materials. A detailed plan also considers potential complications, such as access restrictions or unique structural elements. Understanding these factors in advance helps to anticipate challenges and adjust the plan accordingly.
Gathering Materials and Tools
A well-organized checklist is vital for ensuring that all necessary materials and tools are readily available throughout the project. This checklist should include specific types of Hardie board, fasteners, sealant, and any specialized tools required for the job. Having a complete inventory beforehand prevents delays and ensures a smooth workflow.
- Precise measurements of the affected areas.
- Accurate calculation of the required Hardie board panels, including waste allowances.
- Procurement of appropriate fasteners (screws, nails, etc.) for the installation.
- Selection of appropriate sealant types for the edges and joints.
- Inventory of necessary tools, including measuring tape, saw, drill, and safety equipment.
Comparing Costs of Replacement Methods
Evaluating various replacement methods, such as panel-by-panel replacement or full-surface replacement, is essential for cost optimization. Different methods will involve varying labor costs and material expenses. Factors like the extent of damage and the condition of the existing structure can influence the optimal approach.
Factors Influencing Material Choice
The choice of Hardie board material is influenced by several factors, including budget constraints and aesthetic preferences. Different types of Hardie board may offer varying levels of durability, water resistance, and visual appeal. Budget considerations play a significant role, and aesthetic considerations are important for ensuring the replacement material blends seamlessly with the existing structure.
- Budget: Different types of Hardie board have varying price points. A careful analysis of cost-benefit ratios for various options is essential for achieving a suitable balance.
- Aesthetics: The desired aesthetic for the new siding, such as color and texture, can significantly influence the choice of Hardie board.
- Durability: The specific durability requirements of the environment, such as moisture resistance or wind load capacity, will influence the choice of Hardie board material.
Typical Material Costs
The cost of Hardie board replacement varies based on factors like the type of Hardie board and the quantity needed. Different manufacturers and suppliers may offer varying pricing. This table presents typical cost ranges for various types of Hardie board replacements, which can serve as a helpful guide. These values are estimates and actual costs may vary.
| Hardie Board Type | Approximate Cost per Square Foot (USD) |
|---|---|
| Standard Hardie Plank | $5-$8 |
| Hardie Board Siding | $6-$10 |
| Hardie Board Panel | $7-$12 |
Replacement Methods and Procedures
Replacing Hardie board involves careful planning and execution to ensure a durable and aesthetically pleasing result. Proper techniques for removal and installation are critical for a successful outcome. Understanding the various methods and procedures available will help homeowners make informed decisions.
Different methods for replacing Hardie board are available, each with its own set of advantages and considerations. The optimal method will depend on the specific situation, including the size of the area needing replacement, the complexity of the existing structure, and the desired aesthetic.
Methods for Hardie Board Replacement
Various methods are available for Hardie board replacement, each with its own considerations. Direct replacement, where the existing Hardie board is removed and new Hardie board is installed directly onto the same substrate, is often the simplest approach for small to medium-sized projects. More complex projects may necessitate a more involved method, such as replacing the existing substrate and then installing new Hardie board. Understanding the differences between these approaches can help in selecting the most appropriate method for the specific situation.
- Direct Replacement: This method involves removing the damaged or deteriorated Hardie board and installing new panels directly onto the existing substrate. This method is often faster and less expensive than other methods, but it is only suitable for situations where the substrate is sound and stable.
- Substrate Replacement: In this method, the existing substrate is removed and replaced with a new one before installing the new Hardie board. This approach is often necessary when the existing substrate is damaged, deteriorated, or unsuitable for direct Hardie board installation. It ensures a strong and durable installation, but it is more complex and time-consuming than direct replacement.
Removing Old Hardie Board
Safe and efficient removal of old Hardie board is essential for a successful replacement project. Improper removal can lead to damage to the underlying substrate or surrounding areas. Using the correct tools and following proper procedures is crucial for a safe and effective removal process.
- Safety Precautions: Wear appropriate safety gear, including safety glasses, gloves, and a dust mask. Hardie board can generate significant dust during removal. Ensure adequate ventilation during the removal process.
- Tools and Equipment: Use a reciprocating saw or a demolition hammer with a chisel to carefully cut and remove the Hardie board. Use a pry bar to carefully dislodge the old Hardie board from the substrate. A scraper may be needed to remove any adhesive residue from the substrate.
- Procedure: Cut the Hardie board along the seams and edges. Carefully pry the panels away from the substrate. Be cautious not to damage the surrounding areas. Remove any loose debris or dust from the area. Dispose of the old Hardie board properly.
Installing New Hardie Board, Hardie board replacement
Proper installation of new Hardie board is essential for achieving a durable and aesthetically pleasing result. Following proper procedures will ensure that the new Hardie board is securely fastened to the substrate and aligned with existing panels.
- Substrate Preparation: Ensure the substrate is clean, dry, and free of any debris. Apply a suitable adhesive or sealant to the substrate according to the manufacturer’s instructions. This step is crucial for a strong and lasting bond.
- Panel Placement: Align the new Hardie board panels with the existing panels, ensuring a consistent look and avoiding gaps. Apply the adhesive to the back of the Hardie board according to the manufacturer’s recommendations. Use a level or straightedge to ensure proper alignment.
- Fastening Techniques: Use appropriate fasteners, such as screws or nails, to secure the Hardie board to the substrate. Follow the manufacturer’s recommendations for spacing and depth of fasteners. Use a drill or screwdriver to carefully fasten the Hardie board to the substrate.
Securing Hardie Board to the Substrate
Properly securing Hardie board to the substrate is critical for its long-term durability and structural integrity. Appropriate techniques are essential for achieving a strong and stable installation.
- Adhesive Application: Apply a thin, even layer of adhesive to the substrate, ensuring complete coverage. Follow the manufacturer’s instructions for the type and application of adhesive. Allow the adhesive to cure for the recommended time.
- Fastening Methods: Use appropriate fasteners, such as screws or nails, to secure the Hardie board to the substrate. Ensure the fasteners are spaced evenly and properly installed to avoid damage to the Hardie board. Follow manufacturer guidelines for spacing and depth of fasteners.
- Sealants and Caulking: Seal any gaps or seams between panels with a suitable sealant or caulk. This step will enhance the appearance and prevent water intrusion.
Replacement Process Steps
This table Artikels the steps involved in a typical Hardie board replacement project.
| Step | Description |
|---|---|
| 1 | Assess the damage and plan the replacement method. |
| 2 | Gather necessary tools and materials. |
| 3 | Remove the old Hardie board safely. |
| 4 | Prepare the substrate for the new Hardie board. |
| 5 | Install the new Hardie board panels. |
| 6 | Secure the Hardie board to the substrate. |
| 7 | Seal and finish the installation. |
Materials and Tools Required
A successful Hardie board replacement hinges on careful material selection and proper tool usage. Selecting the correct adhesive, fasteners, and tools is critical for a durable and aesthetically pleasing outcome, and significantly impacts the project’s overall success. Appropriate safety measures must also be factored in.
Essential Materials
The necessary materials for a Hardie board replacement project include adhesive, fasteners, and the Hardie board itself. Selecting the right type of adhesive is crucial for ensuring a strong bond between the new Hardie board and the existing substrate. Fasteners, such as screws or nails, are also vital for securing the Hardie board to the structure. The quality and type of fasteners will directly influence the durability of the installation.
- Adhesives: Various types of adhesives are available, each suited for specific applications. For example, construction adhesive is suitable for bonding Hardie board to wood or concrete, while specialized exterior-grade adhesive is better suited for more demanding applications. Consider the surface type, environmental conditions, and the required level of strength when selecting an adhesive.
- Fasteners: Screws are typically preferred over nails for Hardie board installations, due to their superior holding power and adjustability. Self-drilling screws are a good choice for their ability to create pilot holes, minimizing the risk of damaging the Hardie board. The size and type of fastener should align with the Hardie board thickness and the substrate.
- Hardie Board: Ensure the Hardie board selected matches the original or intended design specifications. This includes considering the thickness, size, and color. Reputable suppliers can provide detailed information on material specifications.
Required Tools
The specific tools needed for each stage of the Hardie board replacement process vary. The selection of tools should prioritize efficiency and safety. For example, using a specialized Hardie board saw can reduce the risk of damaging the material during the cutting process.
- Cutting Tools: A reciprocating saw or a Hardie board-specific saw is often necessary for cutting Hardie board sheets to the correct size and shape. A utility knife and a fine-toothed saw are often helpful for trimming edges. Measuring tools, like a tape measure and level, are essential for precise cutting and placement.
- Drilling and fastening tools: A drill with appropriate drill bits is necessary for creating pilot holes for fasteners. A screwdriver or impact driver is needed to fasten the Hardie board to the substrate. Use a drill bit appropriate for the type of fastener being used and the substrate.
- Measuring and marking tools: A tape measure, level, and pencil are crucial for accurate measurements and markings on the Hardie board and substrate. This ensures the replacement is aligned and correctly positioned.
Safety Gear
Safety should be paramount throughout the project. Protecting yourself from potential hazards is crucial.
- Eye protection: Safety glasses or goggles are essential to protect your eyes from flying debris during cutting and drilling. This is critical for preventing injuries like eye strain or even more serious eye damage.
- Hearing protection: If power tools are used, consider wearing earplugs or earmuffs to minimize noise exposure. This helps prevent hearing loss.
- Work gloves: Work gloves protect your hands from cuts and abrasions. Gloves made of leather or a similar durable material are recommended.
- Footwear: Sturdy work boots or closed-toe shoes provide protection for your feet and ensure stability on the job site. This helps to avoid slips and falls, common occurrences in construction.
Material and Tool Cost Estimation
The cost of materials and tools can vary significantly depending on the specific products and quantities needed. The table below provides an estimated cost range, assuming a typical replacement project.
| Material/Tool | Description | Estimated Cost (USD) |
|---|---|---|
| Hardie Board | 10 sq ft | $50-$100 |
| Adhesive | Exterior-grade | $20-$40 |
| Fasteners (screws) | 100 pcs | $15-$30 |
| Reciprocating Saw | Medium Duty | $50-$150 |
| Drill | Cordless | $75-$200 |
| Safety Glasses | Pair | $10-$20 |
Safety Precautions and Considerations
Replacing Hardie board involves handling materials that pose potential risks if proper safety precautions aren’t followed. Adhering to safety guidelines minimizes the risk of accidents and ensures a smooth, safe project completion. Careful planning and the use of appropriate personal protective equipment (PPE) are paramount.
Essential Safety Measures
Proper safety measures are crucial for preventing injuries during a Hardie board replacement project. These precautions protect workers from potential hazards, such as cuts, abrasions, and exposure to harmful substances. Understanding the risks and employing suitable protective gear significantly reduces the likelihood of accidents.
Personal Protective Equipment (PPE)
Wearing appropriate PPE is a fundamental safety requirement. This includes protective eyewear, gloves, and sturdy work boots. Eye protection shields the eyes from flying debris, dust, or chemicals. Gloves prevent cuts and abrasions, while work boots provide foot protection from falling objects or sharp edges.
Potential Hazards Associated with Hardie Board and Related Materials
Hardie board, while a durable material, presents specific hazards during installation. Dust from cutting or sanding can irritate the respiratory system. Improper handling of fasteners or tools can cause cuts or injuries. Working at heights poses a risk of falls. Exposure to moisture or certain chemicals used in preparation can also pose hazards. Understanding these hazards and employing appropriate safety measures is crucial for worker safety.
Proper Ventilation During Installation
Adequate ventilation is essential during the installation process to mitigate the risk of respiratory issues. Dust generated during cutting, sanding, and installation can contain harmful particles. Proper ventilation systems or procedures, such as using fans, should be implemented to remove the dust from the work area. This minimizes the inhalation of airborne particles and protects the workers’ respiratory health.
Safety Precautions Table
| Hazard | Safety Precautions |
|---|---|
| Dust inhalation | Use a respirator with appropriate filters. Ensure adequate ventilation, using fans or exhaust systems. Work in a well-ventilated area. |
| Cuts/Abrasions | Wear work gloves. Use sharp tools with care and caution. Ensure proper tool maintenance. |
| Falling objects/heights | Use fall protection equipment (e.g., harnesses) when working at heights. Properly secure materials and tools to prevent falls. Use scaffolding or ladders if working at elevated levels. |
| Eye injuries | Wear safety glasses or goggles. Inspect tools and equipment for any potential hazards. |
| Chemical exposure | Use appropriate personal protective equipment (PPE) such as gloves and respirators. Follow material safety data sheets (MSDS) for handling chemicals. |
Troubleshooting Common Issues
Replacing Hardie board can be a complex process, and unforeseen issues may arise. Careful planning and attention to detail are crucial to mitigate potential problems and ensure a successful outcome. Understanding potential problems and their solutions is vital for a smooth replacement process.
Identifying Improper Installation
Discrepancies in the installation process can lead to various problems. Inspecting the existing installation for signs of improper attachment, such as gaps, loose fasteners, or uneven application, is essential. These issues can compromise the structural integrity of the new Hardie board. Common indicators of improper installation include visible gaps between the panels or the presence of bowed or warped sections.
Addressing Material Compatibility Issues
Selecting compatible materials is critical to the longevity and performance of the replacement. Incompatibility can lead to issues such as inadequate bonding, moisture intrusion, or premature deterioration. Mismatched adhesives, improper flashing, or using the wrong type of sealant can result in these problems. Thorough research into material compatibility charts is crucial before starting the replacement project.
Handling Unexpected Problems During Replacement
Unforeseen problems can occur during the Hardie board replacement process. Unexpected issues such as hidden structural damage, challenges with existing framing, or difficulty accessing hard-to-reach areas can impact the project. Maintaining a proactive approach and carefully assessing the situation before proceeding is essential. Consult with a qualified professional if the problem is beyond your expertise.
Preventing Mistakes for a Successful Outcome
Taking preventative measures can minimize the likelihood of errors. Double-checking measurements, carefully following installation instructions, and using appropriate tools and techniques are critical. A well-defined plan, detailed measurements, and meticulous execution can help avoid many potential problems. Adequate preparation and meticulousness during each step are paramount to achieving a successful replacement.
Common Problems and Solutions
| Problem | Solution |
|---|---|
| Gaps between Hardie board panels | Ensure proper spacing and alignment during installation. Use appropriate flashing and sealant to fill gaps. |
| Loose fasteners | Re-secure fasteners using appropriate fasteners and torque specifications. Replace damaged fasteners. |
| Warped or bowed Hardie board panels | Ensure proper support and alignment during installation. Inspect and correct any issues in the framing before applying Hardie board. |
| Material incompatibility | Verify material compatibility charts before installation. Use appropriate adhesives, sealants, and flashing to ensure proper bonding. |
| Hidden structural damage | Inspect the existing structure thoroughly before starting the replacement. Repair or reinforce any damage before installation. Seek professional assistance if necessary. |
Illustrative Examples: Hardie Board Replacement
Replacing Hardie board, a common exterior cladding material, can range from straightforward repairs to complex projects. Understanding different scenarios aids in planning and execution. These examples illustrate various replacement situations, from simple repairs to more involved projects.
Various factors influence the complexity of a Hardie board replacement, including the size of the damaged area, the presence of additional structural issues, and the overall design of the affected structure. Careful assessment is critical to successful completion.
Replacing a Small Section
A small section of damaged Hardie board might be caused by a minor impact, such as a falling branch or a tool mishap. This scenario often requires minimal disruption and is relatively straightforward to execute.
- Assess the damage. Determine the precise area requiring replacement and the extent of the damage. Take measurements for accurate material ordering.
- Prepare the area. Carefully remove the damaged Hardie board section, ensuring the underlying substrate is sound. Inspect for any signs of further damage or rot.
- Install new Hardie board. Use appropriate adhesive and fasteners to secure the new piece. Ensure proper alignment and consistent spacing with adjacent boards.
- Finishing touches. Apply any necessary caulk or sealant to ensure a watertight seal and a seamless appearance.
Replacing a Larger Section (e.g., a Wall)
Replacing a larger section, such as a complete wall, is a more involved project. It necessitates careful planning, precise measurements, and proper material selection.
- Thorough preparation is paramount. Carefully assess the entire wall section, documenting any underlying issues or structural concerns. Accurate measurements are essential for ordering the correct amount of materials.
- Removal of damaged Hardie board. Employ appropriate tools for safe and efficient removal. Pay attention to the underlying substrate to ensure no additional damage is present.
- Sub-structure inspection and repair. Inspect the substructure for any signs of deterioration or damage. Repair any necessary issues, such as rot or structural flaws, before installing the new Hardie board.
- Installation of new Hardie board. Install the new Hardie board panels according to manufacturer’s instructions, ensuring proper alignment, spacing, and adherence to building codes.
- Final steps. Apply caulk or sealant to the joints for a watertight seal and a visually appealing finish.
Replacing Hardie Board Around a Window
Replacing Hardie board around a window often presents unique challenges due to the complex geometry and the need for precise fitting. Care must be taken to maintain a watertight seal.
- Precise measurements are critical. Account for the window frame and any existing irregularities. Carefully measure the space around the window frame for accurate cutting of new Hardie board pieces.
- Careful removal of the old Hardie board. Carefully remove the old Hardie board, ensuring the window frame and surrounding area are protected from damage.
- Careful installation of new Hardie board. Install the new Hardie board pieces, ensuring a tight fit around the window frame and maintaining a seamless appearance. Use appropriate flashing to prevent water penetration.
- Final touches. Seal any gaps or cracks to ensure a watertight seal. Clean the area and inspect for proper alignment.
Significant Damage Case Study
A case study involving significant damage might involve a section of Hardie board severely compromised by a storm or prolonged exposure to moisture. This scenario necessitates a thorough assessment of the structural integrity of the entire area.
- Comprehensive assessment. Evaluate the extent of the damage and the underlying substrate. Look for signs of rot or structural issues.
- Removal of the damaged materials. Carefully remove all compromised Hardie board and associated materials, including any loose or damaged fasteners.
- Structural repairs. Address any structural issues discovered during the assessment. This may include replacing damaged framing, repairing foundation issues, or addressing other structural concerns.
- Installation of new Hardie board. Install new Hardie board panels, ensuring proper alignment, support, and adherence to building codes.
- Final inspection and sealing. Inspect the completed installation for any gaps, cracks, or uneven areas. Apply sealant or caulk to ensure a watertight seal and a finished look.
Final Wrap-Up
In conclusion, this guide offers a comprehensive approach to Hardie board replacement. From assessing the need for replacement to choosing the right materials and following safe installation procedures, we’ve covered the essential steps for a successful project. Remember to prioritize professional assessment for complex issues and always adhere to safety guidelines. With careful planning and execution, you can confidently tackle your Hardie board replacement project.